Manta58 Build Guide
Table of Contents
Print Recommendations
We’ve tested a range of different PLA brands for our Manta58 prints and gotten great results with all of them. Unless you require the specific properties of another material type, we recommend using PLA for your case prints. Any printer with a build volume of at least 7″ x 7″ x 3″ should be sufficient for printing case halves. Double-check that your models are scaled to 100% in your slicer before printing.
Important: most Manta58 case parts are not symmetrical and cannot simply be mirrored in your slicer. Please check your files carefully, and ensure that you are printing all parts with the correct orientation! Files will be labeled with “L” or “R” to indicate whether they are for the left or right half.
As long as your filament is dialed in properly, case halves should not require a brim, though you may wish to add one if you notice warping of the bottom layers. Case corner loops and recessed screw holes (for Manta58/s) will require supports to prevent sagging.

For the standard case variant of the Manta58/s, the larger cutouts cannot bridge and will need supports. We found tree-style supports to be the easiest to remove after printing.

Tenting legs print best in the orientation pictured, with open sides resting on the build plate. Manta58/s legs have additional protruding pegs that must be supported. If your printer has trouble with bridges, you may also wish to add supports to the screw and magnet holes to maintain their shapes.

Manta58/s plates should be printed right side up with full supports beneath the raised areas. We recommend a layer height of 0.16mm or less to ensure smooth overhangs and crisp details. Ironing the top layers may help in obtaining a smoother finish. If the screen cover bottoms are rough after removing supports, a light sanding may help to prevent scratching of your displays.

Manta58/s Build Guide
You’ll need the following parts to complete this build:
- 2x Lily58 PCBs (assembled)
- 2x Manta58/s case halves
- 10x 8mm M2 standoffs
- 20x M2 screws (4mm or 5mm)
- Adhesive rubber bumpers for case bottoms (optional)
- 2-4x Manta58/s tenting legs (optional)
- 8-12x 0.375″ x 0.06″ disc magnets (optional; used for Manta58/s tenting legs)
- 2-4x SKUF Silicone Rubber Keyboard Feet (optional; used for Manta58/s tenting legs)
If you will be using the default Lily58 OLED covers, you’ll also need:
- 2x OLED covers
- 4x 10mm M2 standoffs
- 8x M2 screws
These are not required when using the Manta58/s printed plates.
Assembly Instructions
Prepare the PCBs and Plates
- Secure your switches to your PCB halves through your chosen switch plates. If you are using the Manta58/s printed plates, exercise caution when inserting switches, as the plates may crack if bent too far. Take your time, and support the surrounding structures as best you can.
- If you are using OLED covers in your build, attach them at this time. Full instructions are available on the Lily58 build guide.
- You should now have two plate and PCB assemblies. Holding one half with the switch tops facing up, thread five M2 screws through the holes between your switches. Secure them from beneath with standoffs, tightening them by hand. (If using printed plates, be careful not to overtighten.)
- Repeat for the other half, then set both halves aside.
Prepare the Case Halves and Tenting Legs
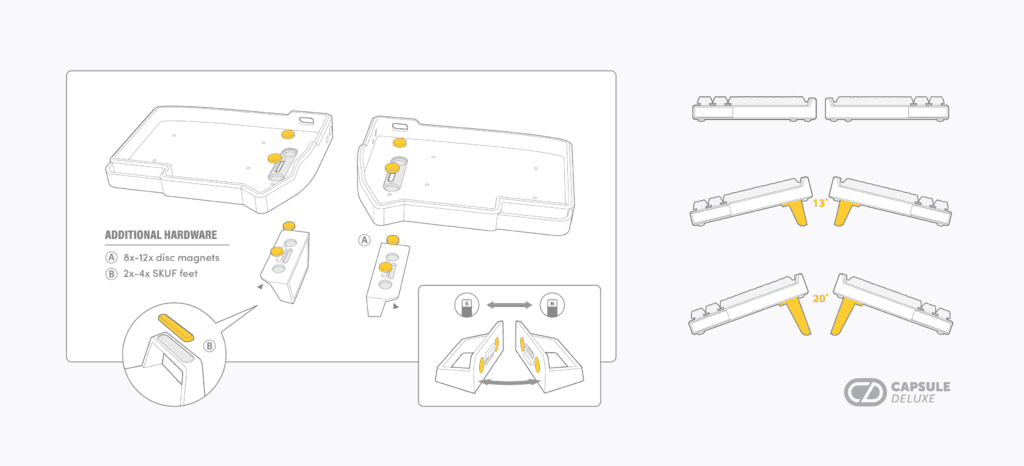
- Prepare the Manta58/s case halves by affixing magnets in the two recesses within each half. We recommend using opposite polarities for each case half—this will allow the tenting legs to attach to one another when not in use! Magnets with matching polarity will stack with the adhesive pads all facing the same direction.
- If using adhesive-backed magnets for the tenting legs, carefully remove the adhesive pads from each, making sure that they are free of any residue. Test-fit them to the case bottoms to ensure that the polarities are correct.
- Apply a strong gel-based epoxy glue or super glue to the reverse side of each magnet. (A thin Allen wrench is a helpful tool for holding magnets in place.) Carefully affix the magnets to each tenting leg, ensuring that the top of each magnet is flush with the leg’s contact surface. Be sure to apply pressure for at least 30-60 seconds.
- Allow all adhesives to cure fully.
Final Assembly
- Peel the adhesive backings on the SKUF keyboard feet and place them within the recesses on the tenting legs, pressing firmly to adhere.
- If using rubber bumpers, peel the adhesive backings, then affix the bumpers to the four furthest corners of each case half. These bumpers will provide some cushion while typing and prevent your keyboard from sliding on your desk.
- Lower the switch plate and PCB assembly for one Lily58 half into the corresponding Manta58/s case half, ensuring that all components are aligned with their respective cutouts.
- Align the standoffs with the case holes, then screw in all five bottom case screws.
- Repeat for the other half.
- Congratulations—you are now the proud owner of a Manta58/s! 🎉
Manta58 (V1) Build Guide
You’ll need the following parts to complete this build:
- 2x Lily58 PCBs (assembled)
- 2x Manta58 case halves
- 2x Lily58 switch plates
- 10x 8mm M2 standoffs (4mm if using Choc switches)
- 20x M2 screws (4mm or 5mm)
- Adhesive rubber bumpers for case bottoms
- 2-4x Manta58 tenting legs (optional)
- 12-18x 0.375″ x 0.06″ disc magnets (optional; used for Manta58 tenting legs)
- 2-4x SKUF Silicone Rubber Keyboard Feet (optional; used for Manta58 tenting legs)
If you will be using the default Lily58 OLED covers, you’ll also need:
- 2x OLED covers
- 4x 10mm M2 standoffs
- 8x M2 screws
Assembly Instructions
Prepare the PCBs and Plates
- Secure your switches to your PCB halves through your chosen switch plates.
- If you are using OLED covers in your build, attach them at this time. Full instructions are available on the Lily58 build guide.
- You should now have two plate and PCB assemblies. Holding one half with the switch tops facing up, thread five M2 screws through the holes between your switches. Secure them from beneath with standoffs, tightening them by hand.
- Repeat for the other half, then set both halves aside.
Prepare the Case Halves and Tenting Legs
- Prepare the Manta58 case halves by affixing magnets in the three recesses within each half. We recommend using opposite polarities for each case half—this will allow the tenting legs to attach to one another when not in use! Magnets with matching polarity will stack with the adhesive pads all facing the same direction.
- If using adhesive-backed magnets for the tenting legs, carefully remove the adhesive pads from each, making sure that they are free of any residue. Test-fit them to the case bottoms to ensure that the polarities are correct.
- Apply a strong gel-based epoxy glue or super glue to the reverse side of each magnet. (A thin Allen wrench is a helpful tool for holding magnets in place.) Carefully affix the magnets to each tenting leg, ensuring that the top of each magnet is flush with the leg’s contact surface. Be sure to apply pressure for at least 30-60 seconds.
- Allow all adhesives to cure fully.
Final Assembly
- Peel the adhesive backings on the SKUF keyboard feet and place them within the recesses on the tenting legs, pressing firmly to adhere.
- Peel the adhesive backings on the rubber bumpers, and affix them to the four furthest corners of each case half. These bumpers will provide some cushion while typing and prevent your keyboard from sliding on your desk.
- Lower the switch plate and PCB assembly for one Lily58 half into the corresponding Manta58 case half, ensuring that all components are aligned with their respective cutouts.
- Align the standoffs with the case holes, then screw in all five bottom case screws.
- Repeat for the other half.
- Congratulations—you are now the proud owner of a Manta58! 🎉